Polymer clay, or polyclay, is a fun modelling material that you can easily bake at home. To successfully bake polymer clay, however, you’ll need to know how to choose a polymer clay oven, how long to bake your polymer clay, and what temperature to bake it at.
How how do you bake polymer clay on aluminum foil? The best way to bake polymer clay on the aluminum foil is to pre-heat your oven to 275 degrees F and bake it for 10-25 minutes, depending on the size of your piece.
In this detailed guide to baking polymer clay on aluminium foil, we’ll answer these and other important questions. Let’s get started.
Using The Oven For Baking Polymer Clay
When choosing an oven for baking polymer clay, you should look for an oven that can reach and maintain the required temperature for baking polymer clay. You could choose to get a dedicated polymer clay oven or you could just use your home oven. You cannot, however, properly cure polymer clay with a microwave oven.
Baking polymer clay using a home oven is perfectly safe. Today, most homes have an oven that can reach the right temperature and hold it dependably.
If your oven can’t hold a temperature without large fluctuations, then you’ll need to use another oven. Most home ovens are also large enough to allow you to bake multiple items – both large and small – at once.
Best Toaster Oven For Baking Polymer Clay
Small tabletop convection or toaster ovens are also a good idea for baking polymer clay. These ovens are cheaper to run than large home ovens and preheat quickly.
They are also very portable and you can place them outside the door if the smell of baking clay irritates you.
We like Toshiba’s toaster oven because it has 9 functions and circulates air inside so that everything bakes evenly.
On the minus side, however, it can be difficult to regulate the temperature of these small ovens. You’re also limited on the amount and size of items you can bake in a small toaster oven.
Thus, they tend to work well only with small projects. Tabletop convection ovens, however, tend to be more spacious and offer more even and reliable temperatures.
What Temperature To Bake Polymer Clay?
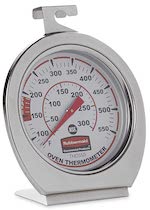
In order to get a good cure, it is essential that you bake polymer clay at the right temperature, which is typically 275 degrees Farenheight. One way to ensure that you get good results when baking is to get an oven thermometer.
Your oven might run hotter or cooler than the temperature you set. So it’s always best to monitor the temperature with an inexpensive oven thermometer like this one.
Polymer clay is heat tolerant and will not burn if the baking temperature is just a few degrees above the recommended setting. If you reduce your oven’s temperature out of fear of burning your clay, you’re more likely to end up with underbaked clay which will break easily.
Thus, it’s important that you bake your projects no lower than 275 degrees F. Unless you inadvertently set your oven to the wrong temperature or your oven malfunctions, you’re not likely to burn your polymer clay. So you should always double-check to ensure that you’ve set the right temperature.
However, if you end up with burnt polymer clay, turn the oven off, open all the windows, and leave the room until the smell clears out. You do not have to worry about decontaminating the area, though, as polymer clay is safe to work with.
How Long To Bake Polymer Clay?
Most polymer clay manufacturers include instructions stating what temperatures to bake the clay at and how long to bake it. However, as a general rule, you should bake most polymer clays for 10-25 minutes, depending on how large the piece of clay is. The larger the piece, the longer it will need to bake in the oven.
How, though, can you tell if your polymer clay is fully cured when your oven’s timer beeps?
Well, you might notice, on taking your polymer clay out of the oven, that it’s quite flexible and conclude that it isn’t fully cured. However, cured polymer clay is flexible, especially if it’s not very thick. Thus, the right test isn’t whether the polymer clay bends but whether it breaks easily.
Polymer clay tends to become softer and less viscous as temperature increases. However, once the temperature reaches a certain point, the PVC particles in the clay start to fuse together causing the mass of clay to harden.
Of course, it’s not a good strategy to test whether your polymer clay project is fully baked by trying to break it. Thus, the best way to accurately tell if your polymer clay is fully baked is to get to know your oven and the clay you’re working with.
It’s a good idea to run some tests with pieces of clay of varying thickness while noting the results. This will help you to learn what baking times produce the best results for different thicknesses of polymer clay.
The longer you bake polymer clay, the stronger the results, generally. If you have large, thick creations, you might need to bake your clay for several hours to get the best results.
Polymer clay won’t burn if it’s left in the oven for a long time, provided it’s being baked at the right temperature.
However, baking for too long can cause lighter colored polymer clay to darken. To counteract this, try covering your polymer clay when baking. You can use a piece of aluminum foil to cover your clay, thus shielding it from the oven’s heat and reducing color shifts.
What, though, if you find out that your polymer clay is underbaked? To fix underbaked polymer clay, you can simply put it back in the oven and bake it again at the right temperature.
The final result may not be as strong as it would have been if it was baked long enough initially. Nonetheless, it’ll likely make it stronger. You can bake polymer clay as many times as you want.
How To Bake Polymer Clay On Aluminum Foil
There are many different methods you could employ to bake polymer clay. There isn’t one right way to go about it. However, if you don’t have any experience with baking polymer clay, here’s an easy yet effective way to get it done.
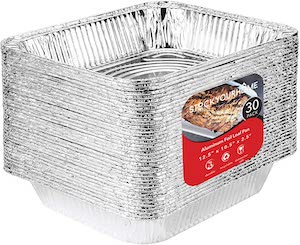
Here’s how to bake polymer clay projects using aluminum foil pans, step by step:
- Place a ceramic or porcelain tile in one pan and then place a plain sheet of scrap copy paper on top of it.
- Place the polymer clay on the paper and cover the pan using another aluminum foil pan.
- Clip both pans together using a binder clip.
- Preheat your oven until it’s at the right temperature for baking polymer clay.
- Place the aluminum foil pans in the oven and start the timer. If you’re going to go outside or far away from the oven, then you might want to also track the process using a portable timer or your smartphone.
- When the timer rings, take out the pans and remove the clip.
- Set the clay aside to cool.
- Since the ceramic tile will hold the heat for a while, you can carefully remove the copy paper holding the clay and place it on some other surface to allow it to cool faster.
- Inspect your polymer clay projects to ensure that they’re properly cured.
- And that’s it! You’ve successfully baked your polymer clay project.
Tips For Baking Polymer Clay In The Oven
When placing your polymer clay in the oven, try to center it as far away from the heating elements. It’s best to place it on the center rack and away from the walls of the oven. Your polymer clay project will burn if it is too close to the heating element.
Covering your clay project is a great idea as it shields it from the heating element. It also ensures a steady level of heat inside the aluminum foil pan, resulting in a more reliable cure.
In addition, covering the clay helps to contain the chemical odors that result during the process, which you, or a member of your family, might not be comfortable with.
Placing a ceramic tile beneath polymer clay projects is essential for maintaining a constant temperature level. The tile serves as a heat sink by trapping and evenly distributing the heat across its surface.
Using a ceramic tile is especially important if you’re using a conventional home oven or a toaster oven. These ovens work by cycling a hot element on and off periodically to keep the space in the oven heated.
If the temperature in your oven tends to drop too much before the element is switched back on, the ceramic tile will help hold the heat for longer.
It’s also a good idea to place a piece of copy paper on top of the ceramic tile before placing your polymer clay on it. If you place raw clay directly on the tile and bake it, you’ll end up with a shiny finish on the places where the clay touched the tile. The scrap copy paper helps to prevent this.
If you’re baking round polymer clay beads, try folding up the sheet of paper into an accordion shape before placing the beads on it. This will prevent them from rolling all over the place.
Hopefully, you’ve found this guide informative and helpful. You should now be better equipped to successfully bake your polymer clay projects.
Up Next: The Best Polymer Clay For Jewelry


