Wood engraving has been around for centuries, and it is still a popular trade and hobby done today. Without the use of printing or computerized imaging, wood engraving involves cutting intricate patterns into wood.
To get started with wood engraving, there are some tools that you would need to have. The tools needed for engraving wood are highly specialized and each serves a particular purpose, but are essential to be able to engrave with precision and ease.
When starting out, you won’t need every single tool, but there are some essentials that you should have.
What wood engraving tools do you need to get started? Some of the tools you would need to get started include a spitsticker, a scorper, and a graver. Other tools include a sharpening stone, a leather sandbag, and a few other helpful items.
If you are wanting to start wood engraving, read on to find everything you need to get started!
1. Spitsticker or Bullsticker
A spitsticker is an essential tool needed to begin wood engraving. This tool comes in different sizes, but its general purpose is to ‘draw’ on the wood. It is great to use for curved lines and lines which taper and swell.
When starting out, it is best to avoid using too small of a spitsticker, as this can be difficult to work with. Your first spitsticker should be a medium-sized one, as this would be the most versatile size to work with.
A bullsticker is a chunkier version of a spitsticker, and has an oval or seed-shaped profile.
While very similar to a spitsticker, a bullsticker has a more bulbous profile, which gives it the ability to create lines that have dramatic swells. It is a very expressive tool that can help you create some beautiful finishes.
Suggested Product: EC Lyons Spitsticker
This spitsticker from EC Lyons has a pointed tip with curved sides, which allows it to draw long and fluid lines that can twist and curve flawlessly. These lines can taper away without ending in a flat or round edge.
Made from high carbon steel, this tool is durable and long-lasting. The handle is comfortable and easy to hold and is warm in the hand to allow for extended engraving.
2. Scorper
A scorper comes in two different types; there is a round end scorper and a square end scorper. Both of these are used quite often, so it does help to start off with both.
Smaller scorper tools, both round end and square end, can be used for linear work. Round end scorpers can be used for stippling too.
When it comes to larger scorpers, they can be used for clearing out larger areas and for making deeper cuts. Square scorpers help to pair away ridges left after initially clearing with a round scorper.
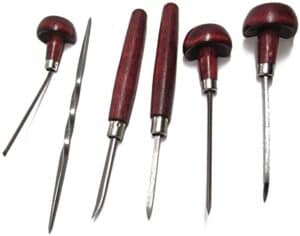
Suggested Product: MJIKOO Wood Carving Scorpers
To cover all the bases of scorpers, this is a great set to buy. It contains a range of different sizes and tips, so you would have the right scorper for each line and detail.
All of the blades are made from high-carbon quality steel and have good hardness and toughness. The blades will withstand use and not break easily.
The sharp blades provide easy carving and can make simple designs or even more intricate finishes. The handles are made from a fine polished wood, which ensures a comfortable feeling and which reduces hand fatigue.
With a total of 12 different shape and size blades, you can improve your work efficiency and ensure you have all you need. The scorpers are all kept in a transparent plastic box, which keeps them safe and organized while not in use!
3. Graver
Graver tools come in two types, either a square or diamond. Gravers are great to use for expressive mark-making, as well as allowing for fine lines that can swell quite dramatically. It does take some time to master using a graver, but it is an essential skill that needs to be learned in wood engraving.
Gravers come in different sizes, allowing you can cut lines of different depths and widths. The deeper the cut of the graver, the wider the incision you will get.
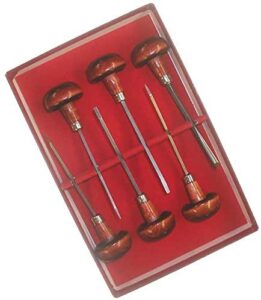
Suggested Product: EC Lyons Ramelson Graver Set
This curved Lozenge Graver set includes #40, #46 Flat, #54, #60 Round, and #3 point. This should set you up with all the different types of gravers you would need for your wood engraving.
These gravers can be used on wood, but they are also suitable to be used on copper, zinc, and other metals.
Set in a box, they will be kept safe and protected while not in use. The wooden polished handles are warm and comfortable to hold and prevent hand fatigue while engraving.
EC Lyons is one of the most trusted wood engraving tool makers, so you know you will be buying a quality set.
4. Tint Tool
Tint tools are a must for wood engraving, although many people tend to forget about them! Tint tools are perfect to create straight lines with an even width, but they are also great for curves, especially tight curves.
Tint tools are also ideal to use for stippling, as it produces a correct dot. A tint tool is not a pointed tool per se, but it does help to create stippling that doesn’t look like harsh jabs.
It is best to avoid fine tint tools as they snap quite easily in wood, and they can produce scratchy work that does not finish well.
Suggested Product: EC Lyons Intaglio Set B
This 6-piece etching set has been hand-crafted to be of the highest quality. They are hardened and tempered which allows them to hold their cutting edge, and to make them safe to re-sharpen time and time again.
There are 6 different shapes, tips, and sizes available in this set, so you would have the right tint tool to use for the purpose intended.
Like with other EC Lyon tools, the handles are ergonomic and comfortable to use, preventing hand fatigue over prolonged use.
They come in a protective box where they are displayed clearly for when you need them!
5. Chisel Tool
Chisel tools are used for pretty much one purpose – chiseling, helping to bevel or chamfer around the edges or corners of a block, mostly where the clearing goes right to the edge. While the chisel has limited use, it is an essential tool.
Suggested Product: Professional Wood Chisel Tool Set
There are 4 chisels in this set, in sizes ¼-inch, ½-inch, ¾-inch, and 1 inch. The blades are slightly oiled, which protects them against corrosion. Black plastic tips on each chisel protect the edges from damage and keep them in the best condition.
The handles of the chisels are made from beech wood and are all tightened with a steel hoop, giving you the strongest and most comfortable grip. Along with the sharp bevel edges, the lightweight handle gives you optimal control while carving, and high precision.
Made from chrome vanadium steel, the blades have a sharp edge and high hardness. They will provide you will all you need to chisel away edges to perfection.
6. Sharpening Stone
A sharpening stone is essential for wood engraving. You would need to sharpen your wood engraving tools to ensure they are effective at cutting away and edging on wood. When choosing a sharpening stone for wood engraving, you do need to be careful with what you choose.
A medium or fine sharpening stone would be best, and if you are able to, then you should try to have both in your kit to suit the different tools you have.
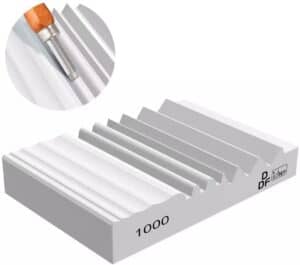
Suggested Product: DDF iohEF Wood Carving Sharpener
This high-quality sharpening stone is made from premium white corundum, which is corrosion resistant, heat resistant, and highly durable. This means it will sharpen your wood engraving tools for years!
Compatible with multiple tools, the sharpening stone has different grooves to suit different size tips. It is a 1000 grit wood sharpener, so it has enough grit to properly sharpen tools without damaging them.
The different grooves and contours match the grooves of different chisels and tools to give you precise sharpening, and the whetstone is also able to sharpen triangular and round chisels in the convex part of the design.
7. Sharp Pebble Sharpening Stones
Check Suggested Product On Amazon
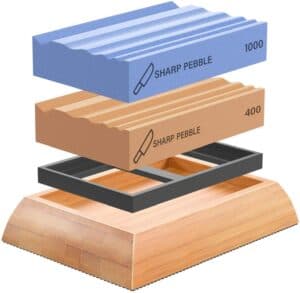
This set includes two different innovative sharpening stones which are 400-1000 grit respectively.
The stones use a new sharpening system that features multiple grooves which allow you to sharpen different wood engraving tools with different points and contours.
The carving sharpening stones are easy to use and only use water for sharpening, no expensive oils. The 400 gritstone is an aggressive stone that helps with dull and damaged edges.
The sharpening stones are made from high-quality materials which ensure that they are tough and long-lasting. You simply swap the stone you want to the top, wet it with the water, and get sharpening in the right contour!
8. Leather Sandbag
A leather sandbag is used to offer up support when manipulating the block of wood, and to raise it off of the surface when carving and engraving. It is important to choose a leather sandbag that won’t slip or move around as you use it, and which gives you proper support.
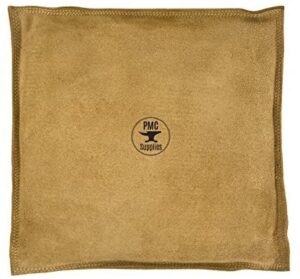
Suggested Product: Square Leather Sandbag
This 10-inch leather sandbag will support your woodblock and offer you better positioning while engraving.
It provides a sturdy base for wood engraving or other similar work. The benefit of the leather sandbag is that it will not slip or move around as you work, which is so important when working on a fine engraving.
The materials used in the sandbag also help to deaden and absorb sound, which keeps your studio a little quieter.
Made with a leather exterior and a sand interior, this slip-resistant work surface is ideal for engraving, and it can be used with or without a bench block.
9. Leather Sand Bag
Check Suggested Product On Amazon
This large leather sandbag measures 9-inches and is large enough to suit just about all your wood engraving needs.
It is ideal for every workbench and will keep work steady and raised as you engrave. The leather sandbag, filled with sand, helps to soften the impact when engraving and works to dampen and reduce noise when working.
10. Oil-Based Relief Printing Ink
Sometimes with wood engraving, you will need to do relief printing onto the wood.
This involves printing onto the surface of the wood so that all that remains on the surface of the wood is the design that needs to be engraved.
It is best to buy an oil-based relief ink, rather than a water-based or water-washable oil ink, which are not often stiff enough. A good oil-based relief ink will be stiff and stable enough on the wood.
Suggested Product: Speedball Professional Relief Ink
The Speedball Professional Relief Ink was developed by artists for artists. It is an oil-based ink that is made with lightfast pigments that have no added fillers.
The ink will provide intense, rich, and crisp prints that allow you to clearly see the image on the wood. It transfers seamlessly and shows even the finest of details.
Relief Ink: Portland Intense Black
Check Suggested Product On Amazon
The Portland Intense Black is a deep black color with a cool undertone.
It has been formulated to be used with all relief techniques and has been bound in high-quality burnt plate oil.
The viscosity of the ink makes it great for many uses, and it will clearly show images on wood when you need to get to engraving.
It is a stiff and steady ink that will provide you with all the details of the image on wood.
11. Ink Roller
An ink roller would be used to apply the relief ink to the wood. To get started, you won’t need anything too fancy, and a synthetic rubber roller is perfect. Just make sure that the roller you use is not old and has not hardened.
Suggested Product: VinBee 3 Pack Soft Rubber Ink Roller
This set has 3 different ink rollers, measuring 2.4-inch, 4-inches, and 5.9 inches. The rollers help to distribute the ink evenly and can be used on curved surfaces too.
The rollers are made from high-quality rubber and are durable and strong. The handles are made with non-slip plastic, so it is easy enough to apply.
This is a good basic set to get for wood engraving, as the different sizes will work for different patterns and designs.
12. Thin Printmaking Paper
Thin printmaking paper helps to burnish designs, and will help to transfer designs onto the wood surface.
Choose a printmaking paper that has a smooth surface, as the more fibrous surface papers might not display finer details as well. Thinner papers are also more suitable than thicker papers.
Suggested Product: Strathmore Paper Pad Printmaking
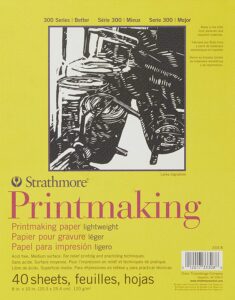
The Strathmore-lightweight printmaking pad is lightweight paper that will help you master relief printing, perfect for printing onto wood before engraving.
There are 40 sheets in total, and the sheets have a slight texture but are smooth enough to be used for wood engraving.
13. White Spirits
Lastly, you will need white spirits for cleaning up once you finish – this will be used to clean off the roller and the blocks.
Suggested Product: U.S Art Supply Odorless Mineral Spirits
This bottle of 4.2oz mineral spirits is a highly refined solvent formula that will thin and clean off oil-based paint, which is ideal for when printing with relief ink.
It will clean paint, tools, and all other equipment, degreasing and removing residue as it goes. It is suitable to be used indoors and outdoors.
How To Print A Design Onto Wood
Before you get to engraving with your tools, it does help to know how to place an image onto the wood, which you will engrave from.
It is quite a process and you will need specific equipment (mentioned above) but with some practice and patience, you will get the hang of it!
Here is how to transfer a design onto wood:
1. Prepare The Wood
You will need to start by preparing the block of wood. There are a few different ways to do this, but this is a simple and easy method that almost anyone can do.
Start by wiping black ink onto the block with a paper cloth. Wipe it so that there is an even tone on the block, and make sure to not put too much ink onto the wood as it could soak in too much. When the ink is dry, wipe the surface slightly.
2. Draw Your Image
The next step is to draw out your image onto paper. You will need to start off simple and think about the form and tonal values of the image before transferring it. Remember that mistakes on the wood are not easy to come back from, so you need to properly think things through.
Take the image and place it on top of a sheet of carbon paper (make sure to measure the image against your block of wood to make sure it will fit). Place these onto the piece of wood and trace over the image with a sharp pencil (do not press too hard of you might press into the wood). Doing this will transfer the image through the carbon paper on the wood.
3. Get Engraving
Once your image has been transferred onto the block of wood, you can get the engraving. Go slowly and carefully, as a mistake is hard to come back from.
If it is your first time engraving on wood, you need to be sure of how you hold your tools. Most engravers lead with their forefinger forward, and others lead with their thumb, and whichever feels most comfortable to you, make sure that the handle of the tool nestles in your palm and your little finger tucks under the groove of the handle.
If you feel as though your tool is too long, you can shorten it for better control.
4. Engraving Tools For Wood
The tools you need to get started with wood engraving can seem intimidating at first. There are different names and descriptions used that seem fairly foreign to most of us. If you are feeling overwhelmed starting out, read through the above list for all the tools you need.
Start off simple and build on your engraving tool kit from there, you don’t want to have to spend a fortune on items that you might not actually end up using. Practice with your tools on some scrap wood first, and then get engraving!
Engraving is a skill that will take time to learn, so make sure to have all the beginner essential items you need, and then get to practicing techniques and find a way to use your tools that is comfortable for you!
Related Questions
What is wood engraving also known as?
Wood engraving is also known as printmaking. This is when an artist works a single image, or multiple images, onto a block of wood.
Is etching the same as engraving?
Etching and engraving both involve creating images onto wood, but there is a difference. Etching is a chemical process that creates images on wood, whereas engraving is a process of carving out the images on wood using certain tools.
Etching uses an acid solution to etch lines on the surface of wood, which helps to create intricate designs.
Can you engrave on wood using a Dremel?
Traditional wood engraving involves manual tools and you engrave on the wood step by step. However, Dremel has made the process easier. The Dremel tool features a high-speed rotary cutting head that can be used to easily engrave onto wood.
Up Next: Best Pyrography Kits


