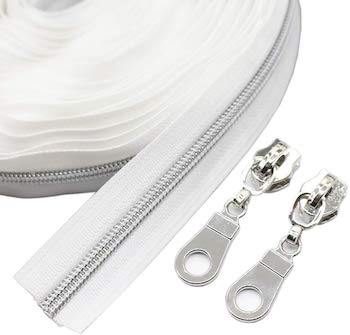
Zipper tape is the fabric part of a zipper that attaches the slider and teeth with the garment of clothing.
An important element of any zipper, the zipper tape – much like the slider and teeth – is liable to wear and tear. Constant use often leads to fraying for zipper tape, which can make your item of clothing look slightly ragged and worn.
So the question is, how can you fix your frayed zipper tape and keep your clothes looking as good as the day you bought them? Basically, you have a couple of options. Perhaps the easiest and most straightforward method is to use some mini tape patches, or if the fraying is really bad then you might need to replace the entire strips of zipper tape.
Use Mini Tape Patches
So first up, we’ll start with the simpler of the zipper tape fixes.
In order to use this method, you’re going to need to buy some mini tape patches which are self-adhesive. All you have to do is cut the tape to the right size, which will probably be quite small since zipper tape typically is.
Then tape up the areas where the tape has detached from the garment of clothing or started to fray. That’s all there is to it for this super simple fix, which should help prevent further fraying, at least for the immediate future.
However, if you’re looking for a slightly more long-term solution, then you might be better suited to a different method since this tape won’t keep the zipper tape in place forever.
Replace The Zipper Tape
The definitive way to fix your zipper tape, and the way in which you can be sure it won’t fray again anytime soon, is by replacing it entirely. While this may sound daunting, it really isn’t as hard as you may think, and it’s worth doing if you’ve had your current zipper for a long time.
Choose your zipper tape
First things first, we need to get our hands on some zipper tape
I recommend that you try to buy a yard of zipper tape, or a long roll, since that way you can cut the exact length you need with plenty to spare. Just to give you a good idea of a product that could work well for this type of project, here’s my top choice for zipper tape.
YaHoGa’s nylon coil zippers by the yard craft bag have everything you need, and more. Equipped with 10 yards of zipper tape and 25 sliders, this craft bag will cover all of your zipper replacement needs for as long as you can imagine.
I suggest going for more than you need since zippers are not only useful for fixing clothes, but also bags and backpacks. You never know when they might come in handy. I also like this product in particular because it comes in a range of colors, so you won’t have to worry about the zipper tape not matching your clothes.
Attach the slider to the zipper tape
Once you’ve invested in some zipper tape and sliders, you’re ready to put them together.
First, make sure that you attach the slider on the right side of the zipper tape. The right side will be the side of the tape where the teeth are visible. The wrong side will be the side where you can see the stitching, and the tape is flat in the middle where the teeth normally are.
Next, you’re going to pick up the zipper tape and pull apart the two sides so that the teeth open up and you create a separation. Take your slider and carefully attach it to one strip of fabric through one of the two holes at the bottom, and then to the other strip of fabric through the hole next to it.
This should be simple enough, but if you have trouble visualizing this process, then take a look at a functional zipper, and it’ll become clear where to attach the slider. Now pinch together the two strips of fabric where you attached the slider, while you pull the slider along the teeth in the other direction.
At this point, you should be left with something resembling a functional zipper, albeit one that isn’t attached to anything.
Measure your desired length of zipper tape
Now comes the time to measure out your zipper tape to make sure everything adds up, and it fits exactly how it should on your item of clothing or bag.
Take a ruler or tape measure and measure the length by placing one end of it at the end of the teeth and marking the length you want with a pencil.
Take note, as you should also make a mark approximately half an inch beyond your desired measurement too. This is to help with stitching and to know where to attach the stops for your new zipper.
Using a sewing machine, make some stitches over the two lines you made on the zipper tape. Then do a backstitch afterward to reinforce the stitch work. Grab a pair of scissors and cut right through the middle of the two stitch lines you just made with the sewing machine.
Now you should have the perfect length of zipper tape for the job.
Attach the zipper tape
Now for the fun part. To attach the zipper tape to whatever you need it for, we’re going to need the zipper we just made, an iron, some transparent tape, a zipper foot and a seam ripper.
First, so to start, you’re going to want to sew through both layers of your fabric with a basting stitch on your sewing machine. Once finished, go over the stitches with a backstitch, before sewing up the rest of the seam.
Use your iron and ironing board to press the seam open. Now flip your fabric so that it’s inside out. Put the right hand side of your zipper onto the right-hand seam line on the fabric. The top of the zipper, which should be open, has to go over the edge of the fabric.
The bottom of the zipper has to be level with the end of the basting stitches you made earlier. You can use some basic tape to keep this zipper in place temporarily while you sew it down.
Flipping your fabric back over – the right side up – sew close to the edge of the seam of the zipper. When you reach the end of the basting stitches, you’ll need to alter the presser foot on your sewing machine so that you can sew the bottom of the zipper stop.
Now sew going back up the other side of the seam. You can clean the basting stitches up by using your seam ripper, and also remove the tape.
That’s all there is to it, your zipper should now be securely attached to the fabric.
Related Questions
How can you prevent fabric from fraying?
So now that we’ve covered the ways you can deal with frayed and damaged zipper tape, let’s look at some general tips for dealing with fabric fraying, and how to prevent it. Fabric fraying is a common problem that we’ve all encountered with our clothes. Don’t let fraying ruin your favorite clothes with these simple tips and tricks.
- Scotch Tape
Scotch tape is a great way to prevent your fabric from fraying. All you’ll need to do is cut a strip of tape out and lay it along the edge of the fabric where you are concerned about fraying. Making sure half of the tape is on the fabric, and half is hanging over the edge, then cut the tape to perfectly line up with the fabric. This will ensure that your fabric won’t fray in the future.
- Fabric glue
A good alternative to using tape, is fabric glue. With a toothpick or something similarly small, spread the glue on the edge of your fabric, making sure you don’t miss any spots. This will effectively prevent any threads in the fabric coming loose.
- Pinking shears
Pinking shears are a variation of scissors which have teeth creating a jagged effect as they cut. Use these pinking shears to cut off the edge of the fabric, and easily prevent any fraying.
- Sewing machine
The sewing solution to your fraying problems, this is one that will be great for those with some sewing know-how. If you happen to have a serger sewing machine, then all you’ll have to do is work your way along the seam of your fabric, and it will prevent it from fraying in simple fashion. If, like most people, you don’t have a serger though, you can use an ordinary sewing machine to do a zigzag stitch.
Adjust your sewing machine to the zigzag option, and feed your fabric into the machine to create the stitch. With a couple of reverse stitches to start, you can secure the stitch better, and make sure you knot your thread when you’re finished.

