Baseball pants are specially designed to stand up to the wear and tear from sliding around and other rigorous activities associated with the sport. Made from a thicker material, and padded in the knees for extra protection during the game, baseball pants are highly durable, and should, in theory, last you a very long time.
However, every now and again life happens, and you look down one day to find that your indestructible baseball pants now have a hole or tear in them. While this will undoubtedly be a concerning moment, don’t worry too much, as there are ways to repair your torn baseball pants and restore them to their former glory.
So how do you repair torn baseball pants? You can go down the traditional route of sewing the tear up, making sure you do so thoroughly to avoid further damage. Or, alternatively, you can go the route of using patches, which you can sew on directly. However, unlike normal pants, you’re going to want some more heavy-duty equipment to deal with the tough baseball pants fabric.
What You’ll Need Before Starting
So without any further ado, let’s discuss some of the potential solutions available to you, so you can spend less time buying new pants, and more time out on the field. Depending on the material of the pants, you have a few options.
Needles
The fabric typically used for baseball pants is polyester. With thicker fabric comes the need for more heavy-duty equipment, since you don’t want your needles breaking or your stitches coming apart soon after you fix the pants up.
So try to get your hands on some heavy-duty needles, made to deal with thicker materials. It’s generally useful to have varying sizes of these needles on hand for whenever you might need them, that way you can find the best for the job. This comes in handy for dealing with other sports equipment like tough bags, or jackets.
Thimble
You’ll also want to invest in a thimble. A thimble, for those that haven’t come across one yet in their sewing practice, is a small cup with pits all over it which you wear on your finger to protect it. This is essential when dealing with tougher fabrics, since you might have to use more force to get the needle in, and you certainly don’t want to prick your finger in the process.
Thread
With regards to thread, try to use a poly-blend material, and not cotton. This is because cotton is more susceptible to wearing down over time, and this is the last thing you want when fixing up your baseball pants.
Cotton is also less likely to hold up when it gets wet, which isn’t ideal since baseball is an outdoor sport, and every now and again you will be running around in the rain and wet grass.
Due to the at times rough nature of the sport on your pants, namely the sliding and running, you will want to make sure the thread you use is tough enough to hold up to a fair amount of abuse.
The last thing to bear in mind with thread is that, like the needle, the thread should be heavy-duty and should be either the same color as your pants or your team’s colors.
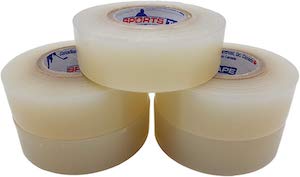
Hockey Tape
Sometimes some strong tape is all you need to fix up some torn baseball pants, so I would advise you get hold of some hockey tape. While this may seem an unusual choice, hockey tape is great for baseball pants repair jobs for a few reasons.
First, it is highly durable and robust. Made for a high contact sport, hockey tape will stand up to all kinds of wear and tear, making it an excellent option for fixing up your baseball pants.
Second, hockey tape isn’t just a temporary fix. It is made to last a long time, meaning you won’t have to keep coming back to your baseball pants for further fixes.
Lastly, it is water-resistant. This means you won’t have to worry about getting your baseball pants wet. Which is huge, since this is part and parcel of the game, especially if you live in a rainy part of the world.
Patches
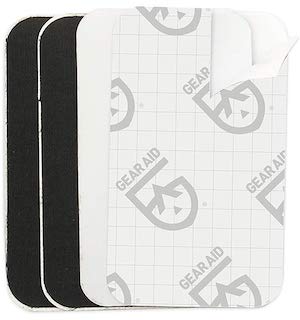
The last thing you will need to know about when fixing up baseball pants is the patches you should use.
There is one very important thing to keep in mind when considering the use of iron-on patches with baseball pants. Due to the flammable nature of polyester, it is imperative that you use a lower heat setting with your iron when applying the patch. If not, then you could end up setting your beloved baseball pants on fire, which is problematic, to say the least.
So while I would highly recommend the use of iron-on patches to fix up baseball pants, I would also advise caution when applying heat so as to avoid potential disaster.
How To Repair Torn Baseball Pants
Now you should be more or less up to speed on everything there is to know about working with baseball pants, as opposed to normal pants like chinos or jeans for example.
Once you have gathered the appropriate materials from the previous list, you can take a look at the various methods available to you, and choose the one which seems like the most suitable.
Iron-on Patches
A great option for any type of pants, iron-on patches are suitable for any kind of tear or hole.
The benefit of going with this method is that you know your baseball pants will maintain their durability going forward. Plus, if you go with a white repair patch, you shouldn’t notice a huge change in the aesthetics of the pants. Even if you do, they’re used for playing sports anyway, so most people probably won’t even notice.
The other benefit of this method is how simple it is. All you’ll need is a repair patch – ideally made with the same polyester as your baseball pants, an iron, and a flat surface. However, if you want to make the fix more permanent, then going over the patch after with a thread and needle is advisable.
The method for applying an iron-patch to your baseball pants is much the same as it would be for normal pants, with one key difference when it comes to ironing on the patch.
Here’s how to apply an iron patch to baseball pants:
- Cut your fabric patch to size. Cut it to an inch wider and longer than the size of the tear. After you’ve done this, make sure you clean up the affected area of your baseball pants by cutting away any loose strands and threads.
- Place the patch over the tear, and—this is the most important part—switch your iron to a low setting with no steam. You can cover your patch with something like a thin layer of cotton fabric, this will help prevent any heat-related damage.
- Run your iron over the patch slowly, making sure to cover it all evenly. Do this for a total of approximately 30 or 40 seconds, and your patch should be nicely sealed in place.
- To further secure the patch, and make sure it isn’t likely to come off in the wash, go over the outsides with your heavy-duty needle and thread.
- You might want to repeat this stitching process, just to make sure it is firmly in place.
Tape
A slightly less involved process, but one that is incredibly useful if you’re going to need your baseball pants to be ready soon, using tape can be your best bet.
As I mentioned earlier, hockey tape is the best option when it comes to working with thicker materials like that which is used for baseball pants.
As simple as fixing something with tape would sound, all you have to do is seal the tear with some carefully laid tape. Of course, this might not seem like the most sound solution, but if you’re in a bit of an emergency and you need a quick fix, then hockey tape is your friend.
You could also use Tenacious tape for the job, if you struggle to get your hands on hockey tape, as it is used for outdoor gear, making it tough and water-resistant.
Sew
Lastly, we have the often-used technique of hand-stitching the tear shut. Providing you know how to sew, this can be an invaluable technique to know, and will even work with baseball pants.
The key to sewing up the tear in your baseball pants in a way in which they will last long into the future, is using the heavy-duty needle and thread that I brought up earlier.
If you use a regular thread and a basic needle, first you will struggle to even grapple with the thick polyester, and even if you manage to make stitches, they most likely won’t be able to hold up to much wear and tear due to their lightweight nature. That’s why it’s important that you use the heavy-duty sewing supplies for the job.
Here is how to sew a tear in your baseball pants:
- Clean up the affected area on the pants first.
- Cut some of your heavy-duty thread to a couple of inches longer than the rip or tear.
- Feed the thread into the eye of the needle.
- Tie off the thread at the end.
- Push the needle through from the inside of the pants, and start to stitch using an up and down motion, pulling the thread taut when you finish and cutting the thread off the needle.


